vShield Manager 5.0.1 Installation and Configuration Part 1
VMware vShield Manager
VMware vShield Manager
vShield Manager is the centralized
network management component of vShield, and is installed as a virtual
appliance on any ESXi host in your vCenter Server environment. A vShield
Manager can run on a different ESXi host from your vShield agents. The requirements
to install vShield Manager are:
System Requirements
Component
|
Minimum
|
Memory
|
8GB
for all vShield components
vShield Manager: 8GB allocated, 3GB reserved vShield App: 1GB allocated, 1 GB reserved vShield Edge compact: 256 MB, large: 1 GB, x-large: 8 GB vShield Data Security: 512 MB |
Disk Space
|
vShield Manager: 8GB
vShield App: 5 GB per vShield App per ESX host vShield Edge compact: 200 MB, large and x-Large: 256 MB vShield Data Security: 6GB per ESX host |
vCPU
|
vShield Manager: 2
vShield App: 1 per vShield App per ESX host vShield Edge compact: 1, large and x-Large: 2 |
NICs
|
2 gigabit NICs on an ESX host for
all vShield components
|
1.VMware vCenter Server 4.0 Update 2 or later
2.VMware ESX 4.0 Update 2 or later for each server
NOTE vShield Endpoint and vShield Data Security require ESXi 5.0 Patch 1 and later or ESXi 4.1 Patch 3
and later.
3.VMware Tools
|
Port
|
Description
|
|
443/TCP
|
Secure communication from, to, and
among the ESXi host, the vCenter Server, and vShield Data Secrity
|
|
123/UDP
|
Communicates between vShield
Manager and vShield App for time synchronization
|
|
443/TCP
|
Secure communication from the REST
client to vShield Manager for using REST API calls
|
|
80 and 443/TCP
|
Used for the vShield Manager user
interface and initiating connection to the vSphere SDK
|
|
22/TCP
|
Communication between the vShield
Manager and vShield App and troubleshooting the CLI
|
Download the vShield manager ova from VMware website here.
Installation is valid for both version of vshield Manager 5.0.1 and 5.0.2.
Log in to
the vSphere Client.
Select File
> Deploy OVF Template.
Click Deploy
from file and click Browse to locate the folder on your PC that contains the
vShield Manager OVA File.
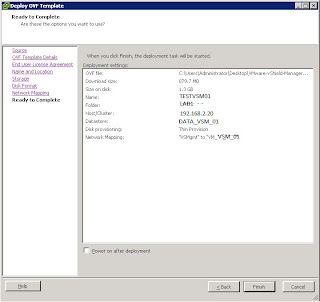
Give the vshield Manager Name as below and click next.
Select the sharded storage, so the vshield manager takes advantage of vmotion and click next.
Select port group that has access to esxi management and vcenter server, Click Next.
Review the information of Name, Folder, Network and finish to complete the deployment.
Complete
the installation. The vShield Manager is installed as a virtual machine in your
inventory.
Power on the
vShield Manager virtual machine.
Configuring the Network Settings of
the vShield Manager
You
must use the command line interface (CLI) of the vShield Manager to configure
an IP address, identify the default gateway, and set DNS settings. You can
specify up to two DNS servers that the vShield Manager can use for IP address
and host name resolution. DNS is required if any ESX host in your vCenter
Server environment was added by using the hostname (instead of IP address).
Procedure
Right-click the vShield Manager virtual machine and click
Open Console to open the command line interface (CLI) of the vShield Manager. The
booting process might take a few minutes.
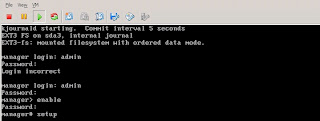
After the manager login prompt appears, log in to the CLI
by using the user name admin and the password default.
Default
username (admin) and password (default) combination as the
vShield Manager
user interface. Entering Enabled mode also uses the password default.
Enter Enabled
mode by using the password default.
manager>
enable
Password:
manager#Setup
Now configure the IP addess in the below screen.
(Optional) If you have configured network settings for the
vShield Manager before, you must reboot the system.
Log out and log back in to the CLI by using the user name
admin and the password default.
Ping the default
gateway to verify network connectivity.
Log
In to the vShield Manager User Interface
After you have installed and configured the vShield Manager
virtual machine, log in to the vShield Manage user interface, vai web browser.
Procedure
1.Open a Web browser window and type the IP address assigned
to the vShield Manager. The vShield Manager user interface opens in a web
browser window using SSL.2.Accept the security certificate.
4. Now logout and login with the changed password.
Synchronize
and Register the vShield Manager with the vCenter Server and Plug-In with the
vSphere Client
You must have a
vCenter Server user account with administrative access to complete this task to
synchronize. The vSphere Plug-in option lets you register the vShield Manager
as a vSphere Client plug-in. After the plugin is registered, you can configure
most vShield options from the vSphere Client.
Procedure
1 Click
Settings & Reports from the vShield Manager Inventory panel.
2 Click the
Configuration tab.
3 Click the vCenter
tab and provide all required information and click on save.
After synchronize with vCenter inventory will appear under setting & Reports in the left side refer below.
4 Click vSphere Plug-in in the right side next to vcenter server
information and Click Register.
4 If you are logged in to the vSphere Client, log out and
Log in.
5 Select an ESX host.
6 Verify that the vShield tab appears as an option.
Date and Time configuration:
vShield Manager can sync to the NTP server for date and
time.
Procedure:
1 Logon to vShield Manager.
2 Click on setting & reporting go to configuration and
Date\Time
Configuring backup for vShield
manager database
Click on setting & reports
In the right side click on backups, fill the host ip and
name details.
This installation and configuration is done with reference to quick start guide in VMware:
This covers Part 1 and Soon with installation of vshield endpoint and permission in part 2.


