Thursday, February 21, 2013

vCenter Server Heart Beat 6.5 with vCenter 5.0 U2 Installation verification testing results auto fail over issues.

vCenter Server heart beat 6.5 installation verification testing.

Not going to discuss on installation procedure, Refer installation document for pre requites and procedure, here i am going to detail only about the testing and verification that was done for vCSHB with VC 5.0 U2, in my lab.
vCenter server heart beat provides uses 4 terms for switch over and failover process as follows.

Managed switchover - Manually making the passive server to active and vice versa, with in the summary tab.
Automatic switchover - Automatically triggered when there is a failure in protected services detected.
Managed Failover -  If the passive server detect that the active server has failed, can send alerts to administrators, there administrator has to perform a manual failover.
Automatic Failover - Automatic failover same as automatic switchover, triggers when passive detects that active is not reachable.

1. Testing Managed Switchover\failover:

Usually performed when there is a maintenance or reboot required for the active nodes.

Connect vCenter server heart beat via Manage Server ( Considering that the groups are added already).
Click on connection under server tab in summary, you will see node, select the passive node and click on make active.
Successfull completion of switch over indicates the managed switchover completion.

2. Automatic switchover\failover:

Here come's the issue.

Logged on to the active server and did a shutdown of the server and failover didn't happen, was surprised and investigate further, later got a update from vmware support saying that its expected and only in case of power failure or a server crash the auto fail over or switchover will happen.

So incase of server shutdown, there is no auto failover.

then powered off the VM and clicked on edit setting, under option tab, clicked on vmware tools and changed the stop option from shutdown to power off.

then tested power off(that is unplug power cord), auto failover was successful.

Note: as per the installation document, it is mentioned that VMware recommends against
attempting to test failover on a properly operating Pair by methods such as unplugging a power cord. At the
moment power is lost, any data not written to the passive server is lost. VMware recommends that all actions intended to verify operation of the passive server be performed as a switchover rather than a failover.

Let me know your test out come or issue to discuss more.


Saturday, February 9, 2013

vCenter Support Assistant 5.1

vCenter support Assistant release 24 Jan 2013,


This is a free plugin for vcenter, to create support request, upload logs, view and update services request etc.

Tried this at my lab and following are the one that has to noted for successful installation of this plugin.

1. vcenter support assistant is a appliance, download it from here.
2. easy installation and configuration refer this.
3. Appliance need Internet access, make sure if you have proxy you have provide with the right credentials for authentication. If it dont have access to Internet then this will not work.
4. DNS resolution is important between appliance and vcenter vice versa.
5. Make sure you have network communication between vcenter and appliance works fine and if there is a firewall necessary ports are open.
6. on successful installation and configuration, a icon in the vsphere client under solutions and applications will show vcenter support assistant as follows.

7. click on that and provide the valid login for vmware support.
8. In the diagnostics all the below should be passed for uploading logs, creating services request.


after the appliance configuration few things to be tested to make sure the appliance works fine.

We need to make sure if the appliance is able to communicate to the below web address and then to vcenter.
   * Connectivity to https://supportassistant.vmware.com and
     https://*.nirvanix.com

   * Connectivity to the vCenter Server and ESX/ESXi hosts
     that you wish to generate log bundles from
you should pass the below when used wget command.

 # wget https://supportassistant.vmware.com
--2013-02-10 07:49:08--  https://supportassistant.vmware.com/
Resolving supportassistant.vmware.com... XX.XX.XX.XX
Connecting to supportassistant.vmware.com|XX.XX.XX.XX|:443... connected.

faced lot of issue while configure this, below are once that made issue to me.

1. issue is while to try to register support assistant, error as "failed to register."
Fix was communication between vc and appliance was not there.
used domain account, changed that to local account worked fined.

2. connectivity of virtual appliance to vmware.com.
Issue with proxy connection, create a exception for this appliance and resolved.

DNS resolution between VC and appliance.
Internet connectivity to appliance.

Thursday, September 27, 2012

vShield Manager 5.0.1 Installation and Configuration Part 1


vShield Manager 5.0.1 Installation and Configuration Part 1

VMware vShield Manager

vShield Manager is the centralized network management component of vShield, and is installed as a virtual appliance on any ESXi host in your vCenter Server environment. A vShield Manager can run on a different ESXi host from your vShield agents. The requirements to install vShield Manager are:

System Requirements

Component
Minimum
Memory
8GB for all vShield components
vShield Manager: 8GB allocated, 3GB reserved
vShield App: 1GB allocated, 1 GB reserved
vShield Edge compact: 256 MB, large: 1 GB, x-large: 8 GB
vShield Data Security: 512 MB
Disk Space
vShield Manager: 8GB
vShield App: 5 GB per vShield App per ESX host
vShield Edge compact: 200 MB, large and x-Large: 256 MB
vShield Data Security: 6GB per ESX host
vCPU
vShield Manager: 2
vShield App: 1 per vShield App per ESX host
vShield Edge compact: 1, large and x-Large: 2
NICs
2 gigabit NICs on an ESX host for all vShield components

 Software Requirements 
These are the minimum required versions of VMware products.
1.VMware vCenter Server 4.0 Update 2 or later
2.VMware ESX 4.0 Update 2 or later for each server
NOTE vShield Endpoint and vShield Data Security require ESXi 5.0 Patch 1 and later or ESXi 4.1 Patch 3
and later.
3.VMware Tools
I am using ESXI 5.0.1 and vCenter 5.0.1
·         The network port requirements are:

Port

Description

443/TCP

Secure communication from, to, and among the ESXi host, the vCenter Server, and vShield Data Secrity

123/UDP

Communicates between vShield Manager and vShield App for time synchronization

443/TCP

Secure communication from the REST client to vShield Manager for using REST API calls

80 and 443/TCP

Used for the vShield Manager user interface and initiating connection to the vSphere SDK

22/TCP

Communication between the vShield Manager and vShield App and troubleshooting the CLI
Download the vShield manager ova from VMware website here.
Installation is valid for both version of vshield Manager 5.0.1 and 5.0.2.
Log in to the vSphere Client.

Select File > Deploy OVF Template.
Click Deploy from file and click Browse to locate the folder on your PC that contains the vShield Manager OVA File.


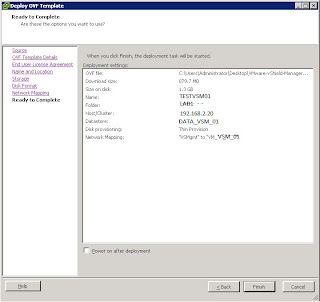
Give the vshield Manager Name as below and click next.

 
Select the sharded storage, so the vshield manager takes advantage of vmotion and click next.

 
I will be selecting thin provision, please select as needed and click next.

 
Select port group that has access to esxi management and vcenter server, Click Next.

 
Review the information of Name, Folder, Network and finish to complete the deployment.


Complete the installation. The vShield Manager is installed as a virtual machine in your inventory.

Power on the vShield Manager virtual machine.
Configuring the Network Settings of the vShield Manager
 
You must use the command line interface (CLI) of the vShield Manager to configure an IP address, identify the default gateway, and set DNS settings. You can specify up to two DNS servers that the vShield Manager can use for IP address and host name resolution. DNS is required if any ESX host in your vCenter Server environment was added by using the hostname (instead of IP address).
 
Procedure
Right-click the vShield Manager virtual machine and click Open Console to open the command line interface (CLI) of the vShield Manager. The booting process might take a few minutes.
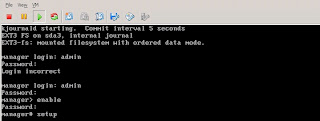
After the manager login prompt appears, log in to the CLI by using the user name admin and the password default.
 

Default username (admin) and password (default) combination as the
vShield Manager user interface. Entering Enabled mode also uses the password default.
Enter Enabled mode by using the password default.
manager> enable
Password:
manager#Setup
 
Now configure the IP addess in the below screen.
 
 
(Optional) If you have configured network settings for the vShield Manager before, you must reboot the system.
Log out and log back in to the CLI by using the user name admin and the password default.
 Ping the default gateway to verify network connectivity.


Log In to the vShield Manager User Interface

After you have installed and configured the vShield Manager virtual machine, log in to the vShield Manage user interface, vai web browser.

Procedure
1.Open a Web browser window and type the IP address assigned to the vShield Manager. The vShield Manager user interface opens in a web browser window using SSL.

2.Accept the security certificate.

3 Log in to the vShield Manager user interface by using the user name admin and the password default.

First thing to change the password, click on setting & reporting and in the right side top, click on change password.


4. Now logout and login with the changed password.
Synchronize and Register the vShield Manager with the vCenter Server and Plug-In with the vSphere Client
You must have a vCenter Server user account with administrative access to complete this task to synchronize. The vSphere Plug-in option lets you register the vShield Manager as a vSphere Client plug-in. After the plugin is registered, you can configure most vShield options from the vSphere Client.
Procedure
1 Click Settings & Reports from the vShield Manager Inventory panel.
2 Click the Configuration tab.
3 Click the vCenter tab and provide all required information and click on save. 
 

After synchronize with vCenter inventory will appear under setting & Reports in the left side refer below.
4 Click vSphere Plug-in in the right side next to vcenter server information and  Click Register.
4 If you are logged in to the vSphere Client, log out and Log in.
5 Select an ESX host.
6 Verify that the vShield tab appears as an option.
 
 
Date and Time configuration:
vShield Manager can sync to the NTP server for date and time.
Procedure:
1 Logon to vShield Manager.
2 Click on setting & reporting go to configuration and Date\Time
Configuring backup for vShield manager database
Click on setting & reports
In the right side click on backups, fill the host ip and name details.
 
This installation and configuration is done with reference to quick start guide in VMware:
 
This covers Part 1 and Soon with installation of vshield endpoint and permission in part 2.


Thursday, July 5, 2012

Uninstall Power Path VE on ESXi5, does not remove the powerpath VE plugin.

1. Use the following to verify the powerpath/VE plugin in ESXi
#esxcli software vib list | grep EMC


Before Uninstall power path VE you need to remove the claim rule of powerpath in ESXI5.

2. Use the below command to list the claimrule.
#esxcli storage core claimrule list
below will be the output of this query.


3. Remove the claim rule assigned for powerpath pulgin with the below command.

#esxcli storage core claimrule remove --rule 250 (starting from 250 to 350 as per above, you have to remove whatever is assigned by powerpath).

4. Once after removing the claimrule, run the following to take effect.
#esxcli storage core claimrule load

5. Verify if all the claimrule associated with powerpath is removed using the following command.

# esxcli storage core claimrule list
you will see the below output.


6. Now we can remove the powerpath plugin successfully using the following.
#esxcli software vib remove -n powerpath.cim.esx -n powerpath.lib.esx -n powerpath.plugin.esx

Reboot the server.

VMware kB reference: http://kb.vmware.com/kb/2016721